How To Draw A Tiger - Easy Steps For Anyone
Have you ever looked at a picture of a magnificent tiger and thought, "I wish I could draw something like that?" Well, you're in for a real treat. Making art, you know, is one of those really wonderful things that brings so much joy. It's a way to express yourself, to put feelings and ideas onto paper, and to create something truly special with your own hands. There's a unique kind of happiness that comes from seeing a blank page slowly fill with lines and shapes, gradually turning into something recognizable and beautiful. It's a process that, frankly, anyone can get into, no matter how much experience they have with a pencil.
Sometimes, the thought of drawing something as grand as a tiger might feel, you know, a bit overwhelming at first. Those powerful muscles, the intense gaze, and, of course, those truly distinctive stripes can seem like a lot to take on. But what if I told you that you don't need to be a seasoned artist to bring one of these incredible creatures to life on your paper? It's actually a lot simpler than you might think, especially when you have someone showing you the ropes, step by step, in a very clear way. We're talking about breaking down what looks like a big task into smaller, really manageable bits.
This whole guide is here to walk you through the process, making sure you feel good about every line you put down. We're going to go over everything from the very first marks you make on the paper to those finishing touches that give your tiger its own character. So, if you've ever wanted to capture the wild spirit of a tiger, or just want to try something fun and creative, you've definitely come to the right spot. We'll make it so that, you know, you can follow along at your own pace, creating something you'll be proud of.
Table of Contents
- Getting Started with Drawing a Tiger
- What Shapes Do You Need to Draw a Tiger?
- Building the Basic Form for Your Tiger Drawing
- How to Draw a Tiger's Head and Snout
- Adding Those Special Tiger Details
- Why are Tiger Stripes a Little Tricky to Draw?
- Bringing Your Tiger to Life - Realistic How to Draw a Tiger Steps
- Can Anyone Learn How to Draw a Tiger?
Getting Started with Drawing a Tiger
So, you're ready to start drawing a tiger, which is really exciting. The first thing to remember is that drawing, especially something that seems complicated, always starts with simple shapes. Think of it like building with blocks; you don't just put the roof on first, right? You start with a good base. This approach makes the whole thing feel much less intimidating, and it actually helps you get the overall proportions correct from the very beginning. It's all about setting yourself up for success, you know, making the initial framework solid.
We're going to look at some really helpful step-by-step pictures, which will show you exactly what I mean. These pictures are like little visual guides, showing each stage of the drawing process. You can see how one simple shape leads to another, and how, in a way, they all fit together to form the creature you're aiming for. It's a quick way to get the hang of things, and it shows you that even what looks like a very complex drawing is just a collection of simpler parts put together. Just follow along, and you'll see how it all comes together.
What Shapes Do You Need to Draw a Tiger?
When you begin to draw a tiger, the secret, if you want to call it that, is to use just a few basic shapes to get things going. These aren't just random scribbles; they're like the skeleton of your drawing, giving it structure before you add any of the more specific parts. You might think of them as placeholders, showing you where the main parts of the tiger's body will be. This initial stage is, frankly, the most important for getting the overall look right, because if your basic shapes are off, the rest of the drawing can feel a bit out of place.
For instance, to start, you'll want to sketch a large circle for the head. This circle doesn't need to be perfectly round, just a general circular shape. It acts as the main guide for where the tiger's face will be. Then, inside that first circle, you'll draw another, slightly smaller circle. This second circle is going to be where the snout goes, so it helps you place the nose and mouth in the right spot. It's a really simple trick, but it makes a huge difference in getting the face proportions right, you know, making it look like a tiger's face and not something else entirely.
These initial shapes, while they might seem a bit crude at first, are the foundation. They help you lay out the overall size and position of the tiger on your paper. Without them, it's very easy to end up with a head that's too big for the body, or a body that's too small for the legs, and stuff. So, taking a moment to put these simple shapes down first is a good idea. It saves you a lot of trouble later on, and it really does make the whole drawing process feel much more organized and, honestly, a lot less scary for someone just learning how to draw a tiger.
Building the Basic Form for Your Tiger Drawing
After you've got those first few shapes down, you're ready to start connecting them and building out the basic form of your tiger. This is where your simple circles and lines begin to take on a more animal-like shape. You'll be adding the body, the limbs, and the tail, all still using very light lines. Think of it like you're gently sculpting with your pencil, gradually bringing the tiger's shape into view. It's a really satisfying part of the process, seeing your initial marks turn into something that looks like a living creature, even if it's just a rough outline.
This step is all about getting the overall posture and movement of the tiger right. Is it sitting? Is it walking? Is it just resting? The way you connect your basic shapes will dictate this. For example, a slightly curved line connecting the head to the body might suggest a graceful neck, while a more elongated body shape will give you a sense of its length. It's about capturing the essence of the tiger's form before you get into any of the finer points, and it's something that, you know, really helps with the realism later on. You're basically creating a blueprint for your how to draw a tiger project.
It's important to keep your lines light during this stage. That way, if something doesn't look quite right, you can easily erase it and try again without leaving messy marks on your paper. This freedom to adjust and correct is a big part of learning to draw, and it means you don't have to get it perfect on the first try. So, just keep those lines soft and flowy, letting your hand move freely as you connect the different parts of your tiger's body. You're just getting the general feel of it, you know, before making anything too definite.
How to Draw a Tiger's Head and Snout
Let's get a bit more specific about that head, which is, honestly, one of the most expressive parts of any animal. You've got your large circle for the main part of the head, and that smaller circle inside for the snout. Now, we'll start to refine those shapes. The large circle helps you place the eyes, which are, you know, really important for giving your tiger personality. You'll want to put them roughly in the middle of that top circle, making sure they're spaced out in a way that looks natural for a tiger.
The smaller circle, the one for the snout, will help you shape the nose and mouth area. Tigers have a distinct muzzle, and that inner circle acts as a guide for its width and length. You can start to draw the actual shape of the nose on top of this circle, then extend lines down to form the mouth and chin. It's about taking those simple circles and, kind of, molding them into the specific features of a tiger's face. This is where your tiger starts to look less like a collection of shapes and more like a creature with a face, which is, obviously, a big step in learning how to draw a tiger.
When you're doing this, pay attention to the curves and angles. A tiger's face isn't perfectly flat; it has contours and bumps. You can gently suggest these by slightly curving your lines. For example, the area around the eyes might have a bit of a brow ridge, and the cheeks will have a certain roundness. Even if you're aiming for an easy tiger, like a baby tiger that looks very cute, getting these facial proportions right is pretty key. A baby tiger, you know, has slightly different features, often with larger eyes and a softer snout, so you can adjust your circles a little to capture that youthful look.
Adding Those Special Tiger Details
Once you have the main body and head sketched out, it's time to start adding the details that truly make your drawing a tiger. This is where the fun really begins, as you start to bring the creature to life with texture and specific features. We're talking about things like the ears, the whiskers, and of course, those truly unmistakable stripes. These are the elements that give the tiger its unique identity and, you know, make it instantly recognizable to anyone looking at your art.
For the ears, you'll want to place them on top of the head, slightly to the sides. They're usually rounded, almost like a little cup, and they often have a lighter patch of fur inside. The whiskers are another really important detail; they sprout from the snout area and add a lot of character. You don't need to draw every single one perfectly; just a few well-placed lines can suggest them. These little touches, you know, really make a big difference in the overall appearance of your how to draw a tiger project, giving it that finished feel.
This part of the process is also where you might start thinking about the fur. Even if you're not going for a super realistic drawing, you can use short, directional strokes to suggest the texture of the fur. This means drawing your lines in the direction the fur would naturally grow, which helps give your tiger a more three-dimensional look. It's a subtle thing, but it adds a lot of life to the drawing. You're basically layering on the personality now, which is pretty cool.
Why are Tiger Stripes a Little Tricky to Draw?
Tigers are known for their distinctive stripes, and, honestly, these can get a bit tricky when you're trying to draw them. It's not just about drawing parallel lines; the stripes follow the contours of the tiger's body, wrapping around its muscles and curves. They also vary in thickness and shape, and no two tigers have exactly the same pattern. This uniqueness is what makes them so captivating, but it also means you can't just slap them on anywhere. You have to think about how they flow with the tiger's form, which is, you know, a bit of a challenge.
One way to make the stripes easier is to think about guidelines. You can lightly sketch lines on the tiger's body to show where the stripes will go, following the natural curves of the animal. This helps you keep them consistent and makes sure they look like they belong there, rather than just being drawn on a flat surface. It's a technique that, frankly, helps a lot with getting that realistic look, even if you're just aiming for an easy tiger drawing. These guidelines are pretty much your secret weapon for getting the stripes right when you learn how to draw a tiger.
When you're drawing the stripes themselves, remember they aren't perfectly straight or uniform. Some might be wider, some narrower, some might fork, and others might have jagged edges. Varying them like this adds a lot of naturalness to your drawing. Also, think about how they would appear on a rounded surface; they'll look different on the side of a leg compared to the top of the back. It's about observing how real tiger stripes look and trying to copy that organic feel. This attention to detail, you know, is what makes your tiger drawing really stand out.
Bringing Your Tiger to Life - Realistic How to Draw a Tiger Steps
If you're aiming for a realistic tiger, then we're going to take things a step further. This means paying closer attention to the underlying structure of the tiger, like its skeleton and muscles, even if you don't draw them explicitly. Knowing where the bones and muscle groups are helps you understand how the fur lays, how the body bends, and how the animal carries itself. It's about getting a deeper grip on the tiger's anatomy, which, you know, really helps with making your drawing look like it could actually move.
We'll cover every step in full detail, from drawing those initial structural lines to adding the very last touches of fur and shadows. This kind of detailed approach means we won't skip anything, making sure you have all the information you need to create a tiger drawing that really feels alive. It’s about building up the drawing in layers, starting with the basic form and then gradually adding more and more specific information. This method, you know, is pretty effective for making a drawing look truly lifelike.
This comprehensive guide is all about giving you the techniques and tips that are truly helpful for creating a tiger drawing that has a lot of energy and feels like it's ready to pounce. We'll talk about how to use shading to give your tiger depth and form, making it look like it's popping off the page. We'll also cover how to make the fur look soft and real, and how to make those stripes feel like they're a natural part of the tiger's skin. It’s about making your artwork connect with the strong presence of a real tiger, which is, honestly, a really rewarding goal for anyone learning how to draw a tiger.
Can Anyone Learn How to Draw a Tiger?
Absolutely, anyone can learn how to draw a tiger! It's not about having some kind of special innate talent that only a few people are born with. It's much more about practice, patience, and following clear instructions. Think of it like learning to ride a bike; you start with training wheels, maybe fall a few times, but with consistent effort, you eventually get the hang of it. Drawing is very much the same way, and it's a skill that pretty much anyone can develop with a little dedication. You just need to be willing to give it a try, you know?
This particular how to draw a tiger tutorial is a little easier than some others you might find, as it focuses on simpler details. This means we're not going to get bogged down in overly complicated shading or super fine fur textures right away. The goal is to give you a solid foundation and build your confidence. Once you can draw a cute tiger with relative ease, you can then start to add more and more complexity if you want to. It's about starting somewhere comfortable and then, kind of, building up from there.
So, follow this easy step-by-step tutorial, and you will be drawing a cute tiger in no time. The most important thing is to just start. Don't worry about making it perfect on your first try, or even your fifth. Every line you draw, every attempt you make, is a step forward. It's all about enjoying the process and seeing what you can create. And, you know, the more you draw, the better you'll get, which is just how it works with any skill. You'll be surprised at how quickly you can pick up the knack for how to draw a tiger, and maybe even find a new favorite hobby!
This guide has walked you through the exciting process of drawing a tiger, starting with basic shapes and building up to more detailed features like the head, snout, and those unique stripes. We've talked about how to use simple forms as a foundation, how to refine facial elements, and how to approach the potentially tricky task of adding the tiger's distinctive markings. The aim has been to provide a clear, step-by-step path, making the art of drawing a tiger accessible to everyone, regardless of their prior experience. It's all about breaking down a seemingly big task into smaller, manageable pieces, allowing you to create a captivating tiger drawing with confidence and enjoyment.

How to Draw a Tiger in 4 Easy Steps | Design Bundles
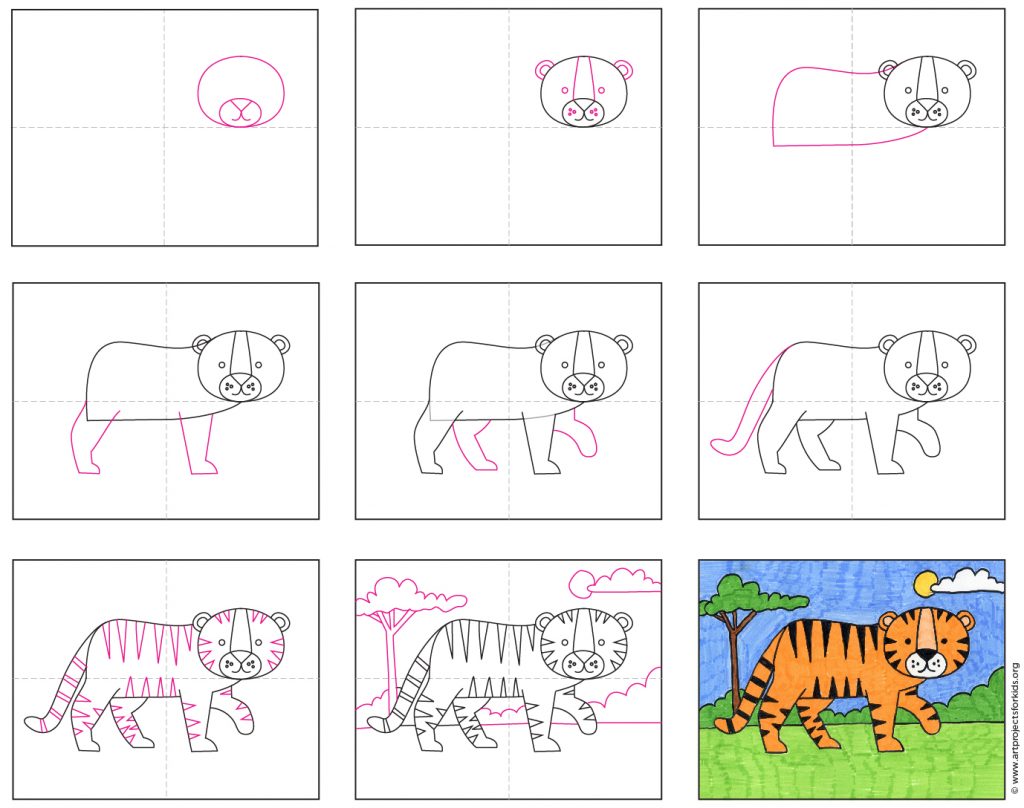
How to Draw a Tiger · Art Projects for Kids

How To Draw A Baby Tiger Easy Drawing Step By Step Pe - vrogue.co
